Data Augmentation (Legacy)
This Feature Is Deprecated
This document describes the data augmentation feature of an early standalone program (not integrated into the main ATSVisionOps program).
This feature has been replaced by the new Object Detection Data Augmentation, whose new features are integrated into the "Tools" group in the main program sidebar, automatically synchronize YOLO label coordinates, and support a richer set of output format options.
New users are strongly advised to use the new version directly; this chapter is kept only as a reference for existing users.
About the Legacy Feature
- At the time, this feature was not integrated into "ATSVisionOps"; it belonged to a separate standalone program, and has since been replaced by the new Object Detection Data Augmentation.
With the data augmentation feature, you can generate more diverse training data based on existing samples, thereby improving the model's robustness to interference and detection accuracy on the industrial floor.
1. Enable the Feature
Open the Training Data Packaging Tool.
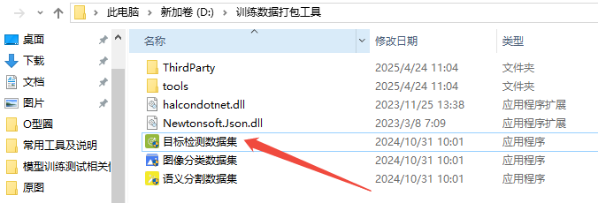
Double-click on the main interface to enter the "Object Detection Dataset" application.
2. Augmentation Operators
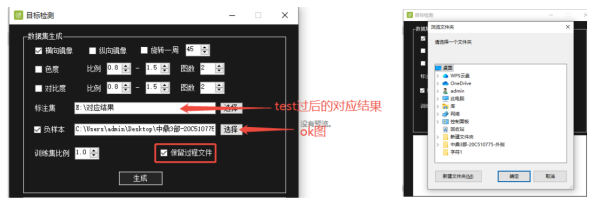
Please select an appropriate mirroring or transformation method according to the characteristics of your product (such as circular, square, surface texture, etc.):
| Augmentation Mode | Core Logic | Applicable Scenarios |
|---|---|---|
| Horizontal Mirroring | Flips left to right along the Y axis as the centerline. | Suitable for box-marked images, for example to distinguish the inner and outer sides of a product. |
| Vertical Mirroring | Flips top to bottom along the X axis as the centerline. | Suitable for box-marked images; improves positional robustness. |
| Full-Turn Rotation | Rotates around the geometric center of the image as the origin; the angle can be freely adjusted. | Recommended for dot-marked images, commonly used for detecting defects on circular surfaces. |
| Hue / Contrast | Randomly adjusts the image color and brightness within a limited range. | The default settings are sufficient; used to simulate lighting variations on the production line. |
3. Parameter Configuration
Configure the following key parameters on the right side or below the interface:
- Image count: The total number of images generated within the configured augmentation range. This value is not fixed; please adjust it flexibly according to the original sample size and your training needs.
- Annotated set (NG): Stores the images of this defect class together with their corresponding JSON annotation files.
- Negative samples (OK): Stores the images of this normal class together with their corresponding JSON files.
Note: Folder Isolation
During local training and packaging, OK samples and NG samples must be stored in different folders; mixing them together is strictly prohibited, as it interferes with the model's feature extraction.
4. Run the Generation
- Complete the mirroring, angle, and parameter configuration described above.
- Click the [Generate] button.
- In the dialog that pops up, choose the target folder for storing the training set.
- Wait for the progress bar to finish; the system will then output the packaged file used for the final model training.
Algorithm Recommendations
- If your detection target has rotational symmetry (such as a bearing or a seal ring), enabling "Full-Turn Rotation" can significantly improve model performance.
- For workstations with unstable lighting, appropriately increasing the "Hue / Contrast" transformation range can effectively reduce false detections caused by lighting.