Image Annotation
The Image Annotation module is one of the core features of ATSVisionOps. It is designed for industrial defect inspection and supports efficient, high-precision image annotation and data management.
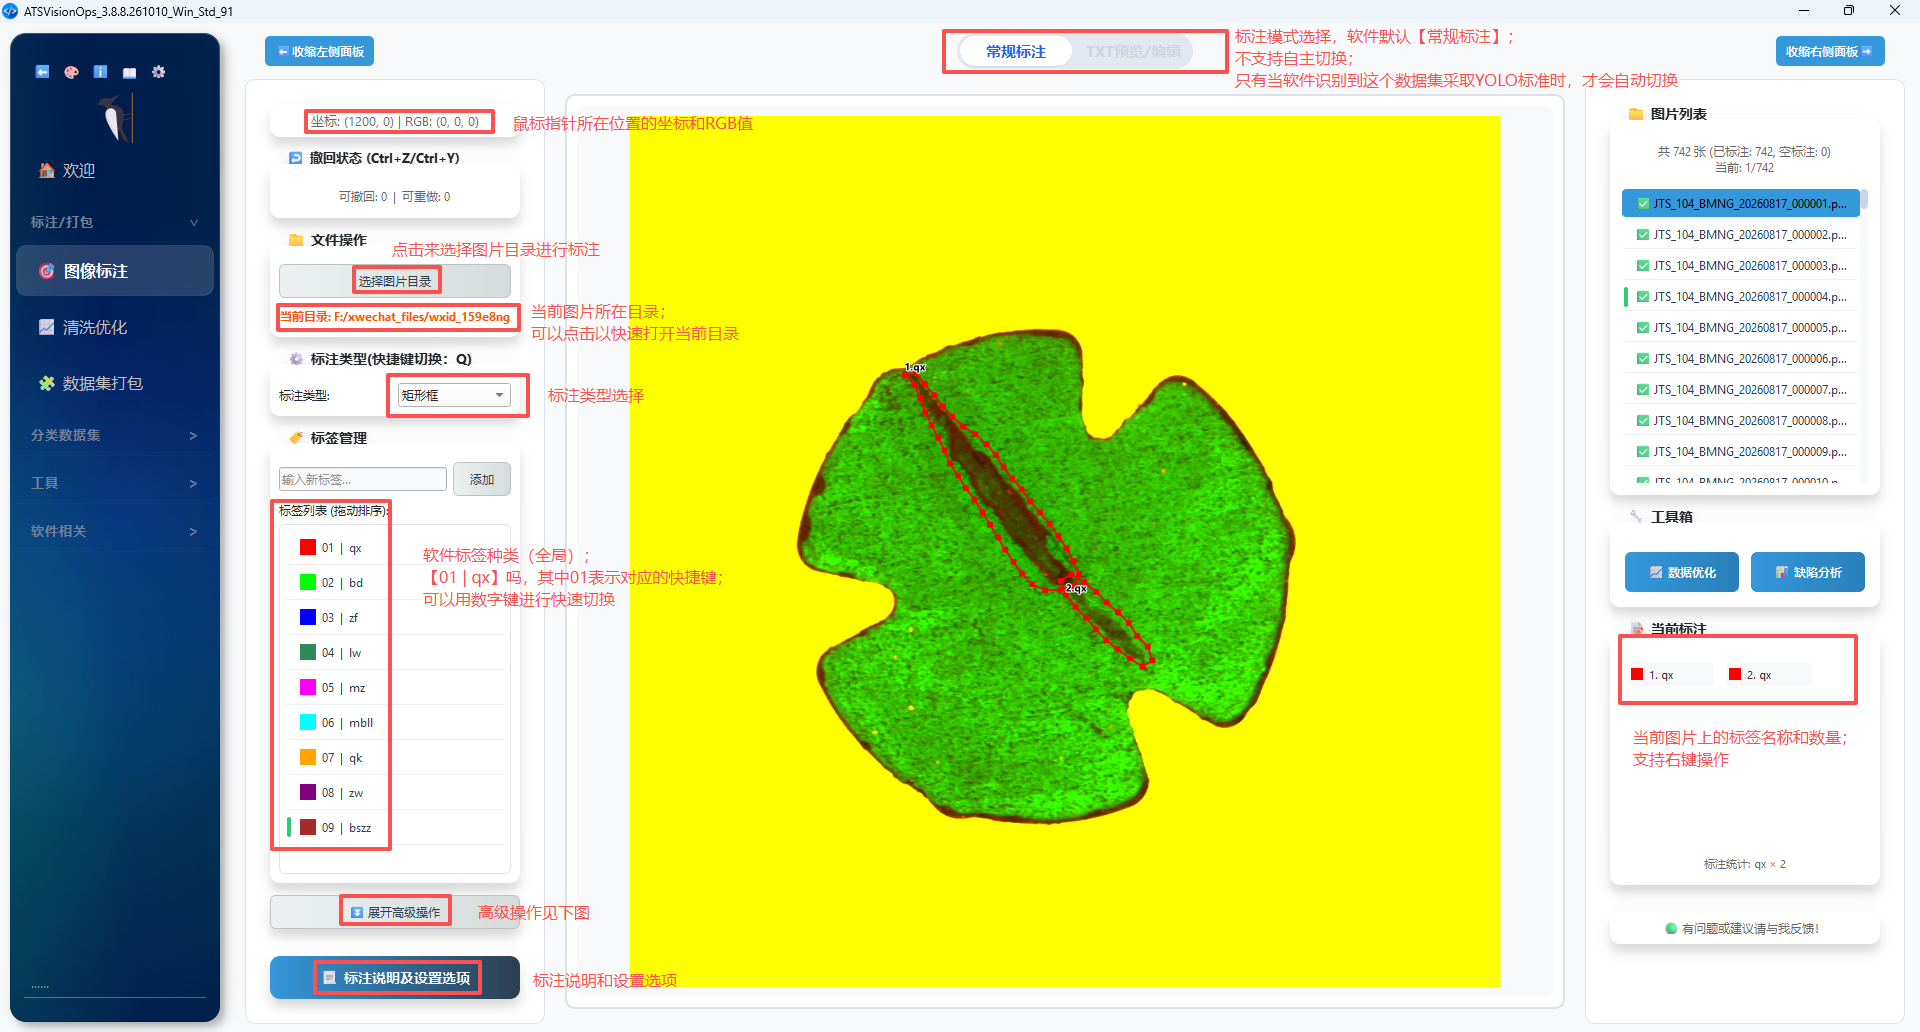
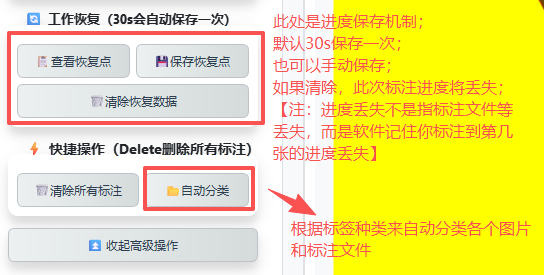
💡: If the images above are hard to see, hold Ctrl and scroll the mouse wheel to zoom.
Quick tour
The first time you open Image Annotation, a 12-step tour guides you through choosing an image folder, selecting a label, drawing your first box, and using the navigation, editing, undo, data tools, and settings. You can use the tools as you follow along or skip the tour. To see it again, click Quick tour at the bottom of the left panel.
1. Basic Annotation and Mode Switching
The system supports several mainstream industrial vision annotation formats, which can be switched quickly with shortcut keys.
- Rectangle annotation: A standard horizontal bounding box (BBox). You can either drag out the box in the traditional way, or enable two-point click drawing mode (same behavior as LabelMe).
- Polygon annotation:
- Auto sampling: Points are added automatically based on a combined logic of both time and distance, together with a two-stage adaptive point-density post-processing.
- Manual point placement: Place points with the left mouse button; press
Escto undo the unfinished polygon point by point. - Snapping logic: Snapping triggers only when the cursor gets close to a connection point, ensuring annotation accuracy on complex edges.
- OBB rotated box: Purpose-built for the YOLO26-OBB architecture; it shares the same logic as regular annotation, so there is no learning curve.
Shortcut Keys
Press the [Q] key to cycle through the different annotation modes.
Multi-Level Esc Cancel
Pressing Esc cancels smartly in the following order: undo the polygon point by point → cancel drawing → cancel dragging / zooming / vertex editing → cancel image dragging → cancel annotation selection. It undoes layer by layer and never "wipes everything at once".
2. A More Convenient Operating Experience
⌨️ Quick Reference for Shortcut Keys
| Category | Shortcut | Function |
|---|---|---|
| Annotation mode | Q | Cycle through the annotation modes |
| Undo / Redo | Ctrl + Z / Ctrl + Y | Undo / redo (a separate stack per image, so stacks never mix across images) |
| Delete | F | Delete the selected annotations (multi-select in the list and delete in bulk is supported) |
| Delete | Delete | Clear all annotations on the current image |
| Switch image | A / ← | Previous image |
| Switch image | D / → | Next image |
| Overlapping annotations | N / P | Select the next / previous overlapping annotation |
| Visibility | H / Ctrl + H | Hide / show all annotations with one click |
| While undoing | Esc | Smart cancel (see the note box above) |
🔍 View Control and Zooming
- Zoom at mouse position: When the wheel is scrolled, the zoom is centered on the point the mouse is currently pointing at.
- Magnifier:
- Crosshair synchronized with the main view: once the crosshair guides are enabled, they are displayed inside the magnifier as well.
- Pixel value display: The bottom information bar shows the coordinates, zoom ratio, guide status, and RGB / grayscale / RGBA pixel values.
- Fallback on error: When the coordinate conversion fails, the image can still be displayed, avoiding a black screen.
- Reset view: Double-click consecutively with the left mouse button to instantly reset the zoom ratio and position of the image.
- Image dragging: Ctrl + left-drag with the mouse; while holding
~or`, all dragging and selection logic is disabled (to prevent mis-clicks). - Pan with the middle button: You can grab and move the entire annotation view directly with the middle mouse button.
3. Label Management and Customization
- Preset system: Label configurations can be saved to a local JSON file and are loaded automatically the next time it is opened.
- Quick numbering: The label list displays numeric indices, and number keys 1-9 can be used to select a class quickly.
- Custom colors: Users can customize the display color of each label, and it refreshes in real time in the annotation area.
- Drag to reorder: The label list supports reordering by dragging with the mouse, and the order is persisted automatically.
- Efficient editing:
- Pop up nearby: The edit box pops up at the mouse click position, reducing large eye movements.
- Memory function: Label edits support manual input and come with a memory function.
- Bulk label change: The annotation list supports multi-select → bulk change of label names.
4. Data Assistance
- Guide line system:
- Crosshair: Vertical / horizontal coordinate lines are shown automatically while drawing boxes.
- Coordinate display: Real-time display of the physical coordinates at the current mouse position, the zoom ratio, and the RGB / grayscale values (magnifier information bar).
- Smart image list:
- Status indication: Three states are recognized automatically — annotated / empty annotation / unannotated:
✅ Light green— has annotations⚠️ Light yellow— the JSON / TXT is an empty annotation⚪ White— no annotations
- Natural sorting:
img2.jpgis automatically placed beforeimg10.jpg. - Right-click to rename an image: The corresponding
.jsonand.txtare renamed in sync, and theimagePathfield inside the JSON is updated automatically. - Click to open the directory: The path in the list is highlighted; clicking it opens the directory directly.
- Status indication: Three states are recognized automatically — annotated / empty annotation / unannotated:
- Move images to a target folder: The "📁 Move to Folder" item in the right-click menu supports custom target folders (used to quickly sort samples such as OK / NG).
- Auto classification: With one click, images are sorted into
classified_results/<label>/by JSON label; multi-label images go intoMulti_class, unannotated images go intoNull_Pictures; multi-threading + progress bar + cancellation are supported. - Crash recovery: If the software exits abnormally, one-click recovery of the previous working state is supported the next time it is opened.
5. Style and Performance Settings
Users can fine-tune the annotation style in the settings panel to match different display devices:
-
Control points: The size and style of the control points at the four corners of a rectangle can be adjusted.
-
Line thickness: A global annotation line width (2px by default); the selected state is highlighted in blue-purple.
-
Grayscale UI: The interface uses a neutral grayscale gradient, which greatly relieves the visual fatigue caused by staring at the screen for a long time.
To accommodate the operating habits of different users, ATSVisionOps provides a customizable settings panel. You can use it to adjust the feel of annotation, the visual style, and the level of automation.
Settings Panel Overview
Open Annotation settings in the left panel. It has five tabs: Zoom, Other settings, Annotation style, Magnifier, and Crosshair. Drawing controls and automatic confirmation are under Other settings.
Zoom Settings
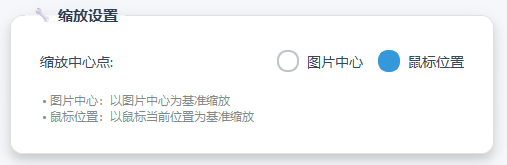
Controls the logical anchor for image zooming, so that different viewing habits can be accommodated.
- Zoom center:
- Image center: When the wheel is scrolled, the image always zooms around its geometric center.
- Mouse position: Zooms around the pixel currently under the mouse pointer, making it easy to "push in" and inspect the details of a specific defect.
Style Settings
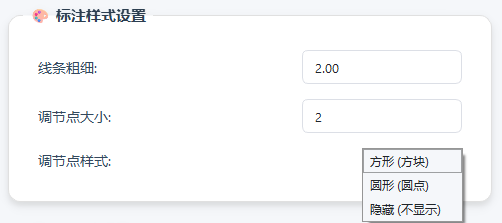
Users can freely adjust the display style of the annotation boxes according to the size of the defect and the complexity of the background.
| Setting | Description | Options / Range |
|---|---|---|
| Line thickness | Sets the pixel width of the annotation box outline | 0.1px - 10px |
| Handle size | Sets the size of the control handles around the rectangle | 1px - 15px |
| Handle style | Sets the shape of the control points used to resize the box | Circle, Square, Hidden |
Assist Tools
🔍 Magnifier Settings
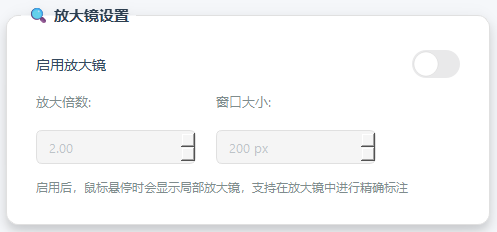
Observe tiny features through a floating window without changing the global zoom.
- Magnification: Adjusts the magnification of the image inside the magnifier.
- Window size: Adjusts the diameter / size of the magnifier floating window.
🎯 Crosshair Settings
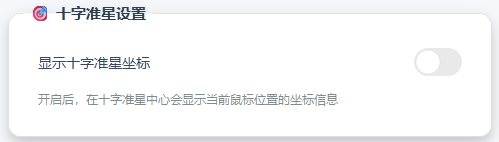
- Coordinate display: When enabled, the current pixel coordinates are displayed in real time at the intersection of the crosshair, which helps with precise alignment.
Automation and Habits (Workflow)
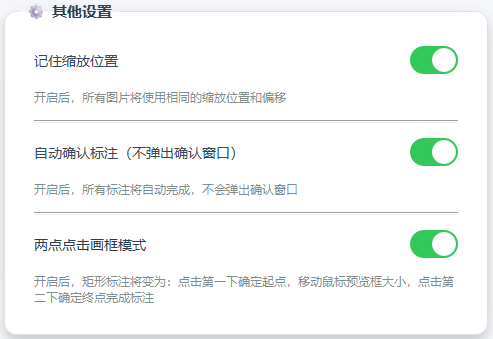
Memory Function
- Remember zoom position:
- On: When switching to the next image, the system automatically applies the zoom ratio and pan offset of the previous image.
- Use case: Suitable for batch defect inspection where the material stays in a fixed position, so there is no need to adjust the view image by image.
Interaction Optimization
- Auto-confirm annotations:
- On: Annotations are saved directly when completed, and the label confirmation window no longer pops up.
- Off: A dialog pops up after each annotation, making it easy for the user to double-check the label class.
Annotation Logic
- Two-point click drawing mode:
- On: The rectangle annotation logic is the same as LabelMe.
- Off: Reverts to the rectangle annotation logic of ATSVisionOps.
Overlapping Annotations and Multi-Selection
- Overlapping annotation submenu: Right-clicking an overlapping area pops up the "✏️ Edit Annotation / 🗑️ Delete Annotation" submenu; each annotation is distinguished by
Label (Type)plus a colored icon. - N / P keys: Quickly cycle through the selected item among overlapping annotations.
- List multi-selection: The annotation list on the right supports
Ctrl / Shiftmulti-selection; the F key deletes the selection in bulk with one click.
Custom Target Folders (Right-click an Image → Move to Folder)
Suitable for quickly sorting large-scale datasets (such as OK / NG / rework / pending review):
- Right-click any image → 📁 Move to Folder → ⚙️ Manage Target Folders.
- Add / edit / delete target folder names in the dialog.
- Afterwards, right-click an image and pick a target folder directly; the image + JSON + TXT are moved together, and a name conflict prompts you to confirm the overwrite.
Best used together with auto classification
Auto classification outputs into classified_results/; the right-click Move to Folder feature suits the manual final review stage, letting you pull out the samples the model finds hard to judge and set them aside.
📂 Auto Classification (based on JSON annotations)
The "📂 Auto Classification" button under advanced operations:
- Creates a
classified_results/output directory under the current image directory. - Runs in the background with multiple threads; a progress bar and cancellation are supported.
- Classification rules:
- Single label →
<label>/ - Multiple labels →
Multi_class/ - No JSON / empty annotation →
Null_Pictures/
- Single label →
- On completion, a dialog shows the statistics: classified, multi-class, unannotated, errors, total.
- Supports file-count verification, to ensure the total stays consistent before and after classification (preventing lost images).
This operation is irreversible
Auto classification moves rather than copies. The original JSON/TXT go into the classification folder along with the image, so please confirm that you do not need to keep the original structure before classifying.
Settings Persistence
All settings changes take effect in real time and are saved automatically to a local configuration file. When the software starts next time, it continues with your personalized configuration, and there is no need to set things up again.
Quick Start
- Import a single image or a folder.
- Use
Qto select a mode, and draw annotations with the mouse. - The app saves annotations as soon as you finish them (confirm if prompted) or edit existing ones. Press
Ctrl+Sto save the current image’s annotations manually. - Click COCO Conversion or Defect Analysis in the toolbar on the right.
Model auto annotation (optional components)
- Switch to JSON annotation mode and open Model auto annotation on the left.
- Choose Install component and select the complete component ZIP. GPU components are larger and optional. Trainer and Python path configuration are not required.
- Select architecture, task, CPU/GPU and a local model, then load it. Modern models use PT or ONNX. Classic models require the complete export directory, including model, parameters, deployment configuration and class names; a
.pdparamscheckpoint is insufficient. - Recognize the current image, then choose Append and save when recognition finishes. Existing boxes are retained. Review, edit or undo results on the canvas. Closing an idle dialog keeps the model for this software session; Stop unloads it.
- Batch processing creates same-name JSON only for images without JSON/TXT files. Existing annotations are skipped. Completed files remain after stop or failure. Review each image; batch output is not one undo operation.
Get components from the download page. After loading a model, close the dialog and press F8 on the annotation page to recognize, append and save with undo support. Uninstall component frees space while retaining models and annotations.
Detection, segmentation and oriented boxes use the existing annotation shapes. Classification is image-level metadata, not a bounding box; edit or clear it with the image category button. ONNX currently uses CPU. Classic detection uses the overlap threshold in the exported model. Empty detection results create empty JSON; classification below the confidence threshold is skipped.